How to Master Dutch Oven Cooking While Camping
January 7, 2021

With that being said, it’s critical to carry a first-aid kit with you at all times. So, don’t forget to pack one in your rooftop cargo carrier, along with any running gear, ski equipment and other travel items.
Dutch ovens are the most classic camp cooking tool available. But cooking with one looks intimidating, compared to the quick gas grills. The truth is — it’s relatively easy to master dutch oven cooking. Plus, it offers lots of advantages!
For starters, this versatile and durable cookware is built rugged and capable of cooking nearly anything. You can roast whole chickens, fry fish and bake peach cobblers for dessert. Seasoned cast iron also leaves behind a deep smokey flavor and even adds the advantage of extra iron to your diet.
So what are you waiting for? Pack your fixin’s and ingredients in your hard cooler and grab the perfect pot! It’s time to master dutch oven cooking while camping!
Dutch Oven Cooking While Camping
When it comes to dutch oven cooking, there are a few things you need to know first. Proper tools can prevent burns and easy cleanup. And, of course, it needs to be well-seasoned. Here are some tool suggestions, as well as seasoning and cooking steps.
Required Tools
Dutch ovens require specific tools to get the job done safely and correctly. Besides the cast iron pot itself, here’s a quick list of what you need:
- Coals or briquettes (a bag of your choice!)
- Long tongs
- Metal lid lifter (stand optional)
- Heat-resistant gloves
- Small ash broom
- Sponge
Cast iron dutch ovens are rather heavy pieces of equipment. One tip is to tuck the meal’s ingredients inside the pot, transported on a cooler with wheels.
Preparing Your Dutch Oven
The cast-iron surface of your dutch oven needs to be seasoned before its first use. A well-seasoned oven creates a protective coating for easy cleaning and a scrumptious smokey flavor. While many dutch oven brands come pre-seasoned, something like a thrift store find might need touching up. To season your dutch oven, follow these simple steps before heading into the wilderness!
- Place the entire oven in your home’s oven, set to 350 degrees Fahrenheit, making sure there’s thorough ventilation.
- Once it’s heated, carefully remove the oven and rub a thin layer of cooking oil with a paper towel.
- Put the pot and lid back inside the oven — this time with a baking tray beneath to catch any drippings — and set a timer for one hour.
- After an hour, turn off the oven and allow the pot and lid to cool.
- Repeat and wipe down with a clean, dry cloth.
Cooking with Your Dutch Oven
With a newly seasoned dutch oven, follow these cooking steps:
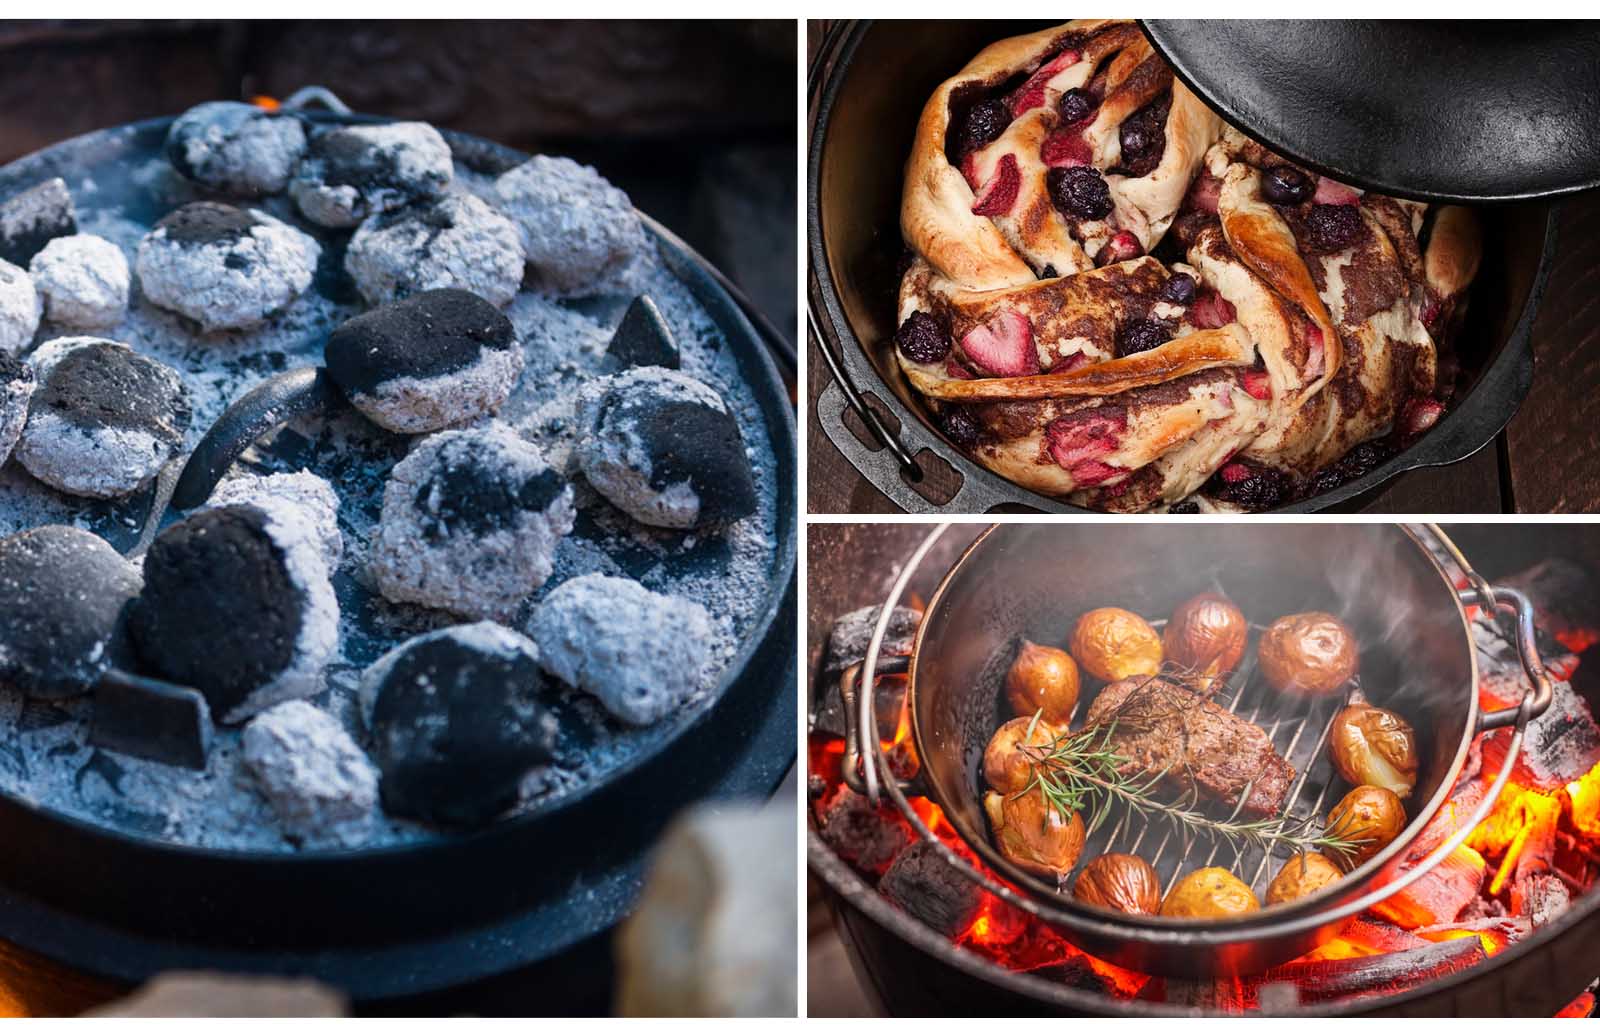
- Light the Charcoal: Create a fire pit or use a BBQ grill, lighting the charcoal or briquettes — your choice! — stoking the fire to get them red hot.
- Add the Food: Once the coals are good and hot, drop in all of your ingredients, keeping it sealed with the lid. It’s also important to learn how to keep food cold while camping, ensuring meat doesn’t spoil and ice-cold beers are ready at hand.
- Arrange the Coals: Using metal tongs — not plastic or silicone! — arrange the coals across the lid and under the pot. Aim for two coals for each inch of your dutch oven’s diameter, plus three extra above and below. For instance, if your pot is 16 inches, you will need 32 coals to maintain temperature.
- Maintain a Steady Temperature: Aim for a temperature of 325 to 350 degrees Fahrenheit to cook your food — especially any meats. As a good general rule, two coals provide roughly 25 degrees, so remove or add coals as needed to adjust. Also, avoid peeking or sampling, which can make ash fall into the food. Just be patient, checking only when it nears time.
- Remove the Ash: Remove what’s left of the coals with tongs and sweep away the ashes to ensure it doesn’t scatter into the meal. Now, dinner is officially served!
More Dutch Oven Cooking Tips
- Make sure to place your dutch oven on a steady surface.
- Keep the lid secure, trapping heat.
- Use wooden cooking utensils, never meltable plastics or silicone.
- Clean out the pot with soap-free lukewarm water, to avoid cracks, and a sponge.
- Never use a steel wool scouring pad to clean cast iron or leave water inside to rust.
- Re-season it between each use.
Once you get the hang of dutch oven cooking, it’s easy as warm pie!

SIGN UP FOR EXCLUSIVE OFFERS
Sign up for our newsletter and get exclusive access to new product launches, special offers and much more.
RELATED BLOGS