The Art of Creating the Perfect Pelican Toolbox
February 17, 2020
Here at Pelican, it’s in our DNA to celebrate the muddy, drenched and downright dirty jobs in which our products are trusted to perform.
We sat down with Professional Bike Mechanic and Founder of Abbey Bike Tools, Jason Quade and his good friend and fellow mechanic Brad Copeland. Who better to ask about the step-by-step process of creating a personalized, everything where it should be, Pelican Toolbox.
Brad is currently based out of California with over 20 years of experience working with bikes. He has traveled internationally to attend bike races including the UCI Mountain Bike World Cup Series and the Olympics in Switzerland, Australia, Czech Republic, France, Spain, Italy, Germany, Canada, and Japan. All of these experiences have provided him with a strong basis for the tools and brands he likes and trusts.
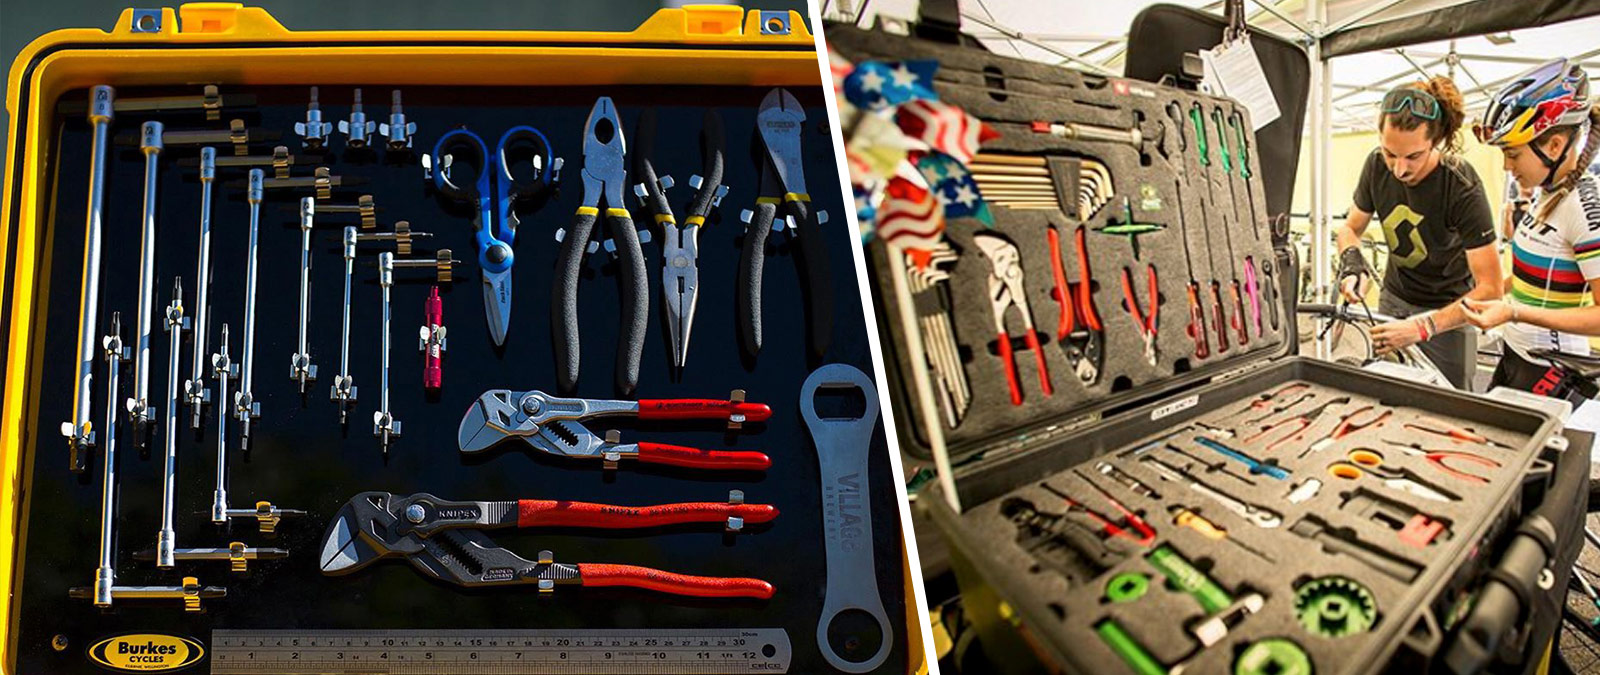
Men and women on Brad’s team are #1 in the world, meaning they are supported by pro teams with the best equipment and tools at their disposal. With many riders not being very mechanically aware and knowledgeable, this forms the deep trust between riders and their mechanics. There is a strong equipment focus in cycling versus other sports, where equipment has a make or break affect the outcome, you can be the best rider in the World, but if your bike brakes or isn’t customized correctly the elements of the race - you won’t place first. For fans, this translates into an increased interest in the technological / mechanical side of cycling, which paves the way for a natural pathway into highlighting the tools and technology behind the sport based on the fact that the supporting crew can make the difference between a rider’s win or loss.
With all this focus on a mechanic’s craft, creating the perfect toolbox has become an art form, with various mechanics, hobbyists and craftsmen all vying to have the sharpest looking kit. Brad and Jason both provided us with their insights into how they create the ultimate Pelican Toolboxes, and advice for those looking to create their own. This step-by-step process entails choosing the right case, selecting which tools to include and how to create the best cutout for the equipment.

Step #1: Case Selection:
Pelican now has more case sizes than ever before, thus allowing for maximum efficiency, choosing the right case to house your selected tools, without any wasted space. In the Pelican Air series alone (which is 40% lighter than traditional polymer cases) there are 16 differently sized Pelican Air cases to choose from.
Brad recommends choosing your case based on where / how you use it. Flying international versus driving locally, the goal being to choose the smallest case that can accommodate the tools you’ve deemed necessary. Based on TSA restrictions, Toolboxes are normally required to be checked, so avoiding oversized/overweight baggage fees is also a consideration. Due to the necessity of checking your bag on airlines, case durability and interior fit become extremely important to keep your tools in-place and protected.
Here are a few of our favorite case models for toolbox builds:
Pelican 1535 Air Case - Interior: 20.4" × 11.2" × 7.2" - Carry-On size, with wheels - second generation of the industry standard camera case - the Pelican 1510 Protector.
Pelican Long Cases - Interior: 44" × 16.8" × 7.9" - Long Cases that might normally carry a rifle create an excellent canvas for your toolbox as everything is visible with no layers.
Pelican 1465 Air Case - Interior: 18.6" × 10" × 10.9" - this case follows more of the traditional toolbox shape, evenly split between lid and case body. Great for deployment on uneven surfaces.
Pelican 1607 Air Case - Interior: 21.1" × 15.8" × 11.6" - Wheeled case and very deep. If you needed to fit power tools or other larger sets this would be a case to consider.
Step #2: Tool Selection:
Starting with the basics, many Custom Pelican Toolboxes we’ve seen feature layers of foam that have been cut to snuggly fit specific tools. Starting with the number of foam layers in the case model you selected, you can begin to think about how one would organize the prioritized tools on each layer. According to Brad, he currently has 85 tools in his Pelican 1560 Case turned Toolbox, with 90% of them being used consistently. Therefore the first step in successful tool selection is prioritization, which tools do you use most often or need to be accessed quickly. Those prioritized tools end up being on the top of your layers, with the tools needed less often (or sometimes larger tools) sitting on the bottom of your layers.
Jason recommends starting with cardboard cutouts the size of your case that represent your layers. Label them according to which goes on top and begin to prioritize and organize your tools on each layer.
Adage holds true here, measure twice - cut once. Best of luck to all our Pelican tetris players on only measuring twice, as the best placement of tools seems to be an ever evolving preference.

Step #3: Foam Selection + Cutout Process
The final element of the toolbox creation process is choosing and cutting the foam to effectively secure your tools in the correct positions. Jason & Brad both use Kaizen Foam inserts based on the fact that they are relatively inexpensive, easily customizable, and slightly more rigid than other foams, plus they can come in a large number of layer configurations. By first tracing in sharpie, Jason uses an electric hot knife to cut to a specific depth within the form which allows tools to sit flush with the top of the foam layer. When you complete your toolbox, share your creation with the hashtags #CustomPelican & #PelicanAtWork, we’ll keep an eye out and feature your box! If you have any questions along the way please contact us through the Pelican Professional Instagram.


Case examples provided by: @bbcopeland, @abbeybiketools, @codygauer, @tom_theparty_woods, @mechantress and @yunggrant